Water heaters are a necessity in homes across the world. However, no matter how efficient and reliable your water heater is, it must be maintained to perform at its optimum levels. Traditional water heaters require regular maintenance more often than tankless water heaters. Proper maintenance can help extend a traditional water heater’s lifespan. However, there are essential steps that must be taken during maintenance to ensure your water heater is not damaged.
Check the Pressure Valve
When a water heater heats water, steam causes the tank walls to expand, leading to a build up of pressure. That’s where the temperature and pressure relief valve (T&P) comes in. Gas and electric water heaters have this safety feature to protect tanks from damage.
The relief valve releases the remaining pressure, with some escaping through the pipes into the water heater. Without this valve—or if the valve is damaged—the tank has a high chance of exploding. This is why it’s crucial to check its efficiency.
To check the water pressure gauge, you will need to do the following:
- Switch off the power or the gas to extinguish the pilot light on the water heater.
- Cut off the water heater’s cold water supply.
- Position a bucket under the discharge pipe connected to the relief valve.
- Pull the valve’s trip lever. After doing this, you will hear a little air rush or see water and vapor escape through the pressure valve. If this doesn’t happen, it’s time to replace the relief valve.
How to Replace the Temperature and Pressure Valve
- To replace the pressure valve, you must first drain the water into the tank.
- Next, remove the discharge pipe and unscrew the old valve from your water heater. You can do this with a pipe wrench. Make sure to note the stem length so you get the same size for your replacement. You can also take it to your local hardware store so they can help you get the right size.
- Screw the new valve into place and ensure you tighten it.
- Reconnect the discharge pipe, and then turn on the water. Also switch on the electricity or restart the pilot light.
- Make sure to always follow the manufacturer’s guidelines for your water heater when testing and replacing the TPR valve.
Flush the Tank
Flushing the water heater tank helps prevent the build up of sediment. Sediment build up can lead to several problems, including decreased efficiency. It can also clog your water lines, reduce the tank’s ability to keep the water hot, and increase wear and tear on the tank.
Make sure you flush the tank every time you test the relief valve, which you should do annually.
Here are the steps to follow when flushing your water heater tank:
- Turn off the electricity or gas to the water heater.
- Shut off the cold water inlet.
- Connect a garden hose to the tank’s drain valve. You have two options: empty the water into a metal bucket or direct the pipe toward a safe area where the hot water cannot cause damage. Ensure that the pressure relief valve is open.
- Leave the tank to drain completely by opening the drain valve. Let the water run clear to remove all sediment that may be clogging the water pipes.
- Close the tank drain valve once the tank has been entirely drained, remove the hose from the valve, and shut the pressure relief valve.
- Turn on the hot water spigot in the sinks or tub to prevent a vacuum from forming in the water lines. Also turn on the cold-water inlet to the water heater tank.
- Turn off the hot water spigots when the water starts to flow from them.
- Finally, switch on the electricity or the gas to your water heater.
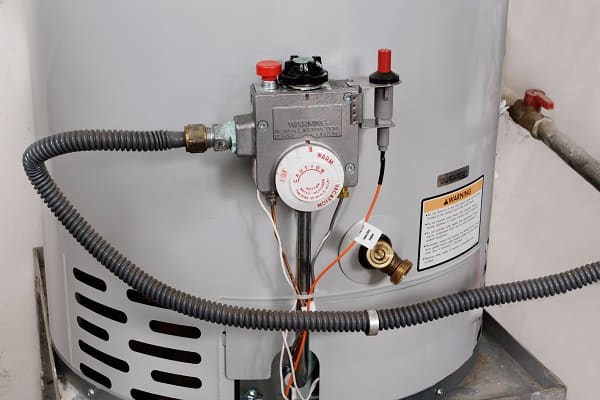
Lighting the Pilot on a Gas Water Heater
Note: Before attempting to light the pilot, it’s always important to read and follow the manufacturer’s lighting instructions.
- For most models, you should begin by turning the gas valve to the “on” position.
- Set the control knob to “pilot,” press the knob, and then press the igniter button. When the light is on, it should blink, and a little flame will be visible through the view pane.
- To avoid overheating and prolong the longevity of your water heater, ensure you set the temperature to 120 degrees Fahrenheit.
Before You Connect Electric Power to Your Electric Water Heater
Many people mistakenly switch the power on before the tank is filled with water. Don’t do this—the heating elements should be completely submerged in water before turning on the power. Otherwise, the upper heating element can burn out. If damaged, you’ll need to replace your heater as it won’t be able to properly produce hot water. Unfortunately, replacing the heating element can be expensive and time-consuming.
It’s crucial to call in a professional plumber if you want to replace the heating element. Also remember that failing to replace the element properly could lead to an explosion, more damage to the tank, or even electrocution.
Do a Visual Inspection for Leaks
A faulty water supply connection causes leaks in your water heater. That’s why you must perform regular visual inspections on your water heater. If you notice your water heater leaks, call in a trusted plumber. The benefit of involving professionals is that apart from checking the water piping, they will also check the gas piping and other connections.
Don’t Risk an Issue With Your Water Heater—Instead, Contact Your Trusted Team
It’s important to always perform regular maintenance of your water heater. Unfortunately, even with proper care, water heaters can develop problems over time, leading to repairs. Don’t risk the safety of your family or guests by trying to fix the issue yourself. It’s crucial to have a trusted team that you can contact for water heater repair or replacement. At HEB Plumbing & Sprinkler, we have a team of experienced professionals who can help you with all your water heater needs.
Call us to speak to our representatives. You can also contact us through our website to learn more about our water heater maintenance services.